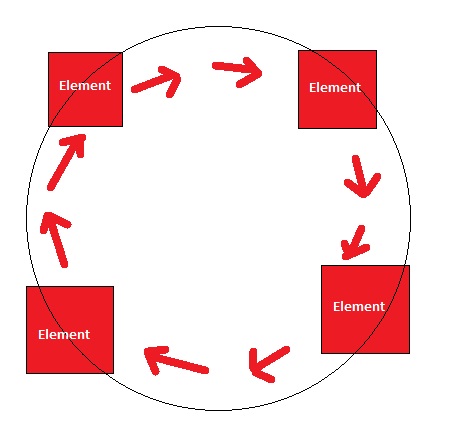
A fun animation with a good dose of technical quirkiness is one where we have items rotate around a particular point. Take a look at the following:
Notice that we have a bunch of different food-related emojis spinning around a very happy smiley in the middle. In this article, we'll look at how to make this spinning work and go down some deep technical alleys to understand why it works the way it does. To make the most of our time here, beyond having a basic understanding of HTML and CSS, make sure you have brushed up on your knowledge of CSS transforms and the basics of how to create an animation in CSS. Those two topics will be front and center of what we will be looking closely at.
Before we get to the technical details, let's first take a step back and talk about how we can pull off this animation. By default, let's say we have a fixed-size element like a square (could be adiv, image, or any other element) that we want to rotate:
Pause & Loop Css Animations With Wait! Animate
There is an origin point all of these elements have. This is typically the vertical and horizontal center known as the transform origin. It is from this origin point all of our element's calculations for size, rotation, position, etc. will be based on. Since we are going to be focusing on rotation quite a bit, when we rotate an element, the element will rotate around its origin point:
To rotate an element around another point altogether, we need to change this behavior. There are two things we need to do.
The first step is the trickiest. To ensure our element is centered over the point we want to rotate around, there are too many situational things we need to think about. This could be an absolute position we specify. It could be centering and overlaying using Grid or Flexbox. There are a variety of ways to do this, so we'll have to handle this on a case-by-case basis. For now, let's just assume that we have a way of placing our element over the element we wish to rotate around.
The Main Difference Between Css Animations & Transitions
What isn't situational is the second step where we translate our element. If we translate our square horizontally, it would look as follows:
Here is the thing to keep in mind when translating an element in CSS. When we translate an element, we aren't physically moving the element. The element is still in its original position. It just appears to have moved over:
Any transform-related changes we make, such as a rotate, will occur as if the element is still in its original position. This detail is crucial to pulling of our rotation effect, for if we rotate our square after this translation, instead of the square rotating around its point of origin, what we actually get is our desired effect:
Css Border Animations
The size of the rotation is determined by how far we translated our square. Pretty neat, right? There are a few more details we need to consider, but we covered the big ones here. We'll deal with these additional details as part of building our rotation effect out.
In the previous sections, we conceptually looked at how to pull off our effect where we rotate an element around a point. It's time to turn all of those images and words into something our browser understands.
If you want to actively follow along (as opposed to kicking back and just reading 🛋️), create a new HTML document and add the following markup to get our example started:
Simple Css Animation For Epub: Blog@igp
After you've added all of this, save your document and preview it in your browser to make sure everything looks good. What you see should look something like the following:
Once you have verified that your starting point matches mine, take a few moments to understand what the HTML and CSS are doing. The main action happens in the appropriately named main div element that houses the smiley that we want our items to rotate around:
The main div is a rectangular container that will house our images, like the smiley and our food items. The contents of this container will be centered horizontally and vertically, as specified by the following grid-related properties:
Circle Rotate Loading Animation With Particles
The contents will also stack on top of each other, and the .main > * style rule is responsible for that behavior:
These two style rules combined are what help our smiley to be located perfectly at the center of of the main div container. As we will see very shortly, this is what will also allow our subsequent food-related images to be centered perfectly as well.
With our starting point all ready to go, our first real task is to add an item to rotate. To do this, add the following highlighted line to our HTML:
Making The Transition From After Effects To Css Transitions And Keyframes — Smashing Magazine
We added an image element with a class value of food to our main divcontainer. If you save your changes and check the results in your browser, you will see our newly added image (of an avocado!) centered and placed directly above our smiley:
Since we want our food images to rotate around our smiley, we also finished our first step of positioning our rotated element directly over the point we wish to rotate around. This was automatically handled for us because we already had specified the various grid-related properties to ensure horizontal and vertical centering and stacking.

Our next step is to translate and rotate our item. As strange as this will sound, both of these transformations are done as part of the animation keyframes. Go ahead and add the following blocks of CSS towards the bottom of your style block (just above the closing tag):
The New Code
Before you do anything else, save these changes and preview in the browser. If everything worked, you'll see that our avocado properly rotates around the smiley:
Looking more closely at the CSS, we have our .item style rule that targets our avocado image element. This rule contains the animation property that specifies details about the, um...animation:
The relevant details are that our animation will take 6 seconds to run, will loop forever, and run linearly with no easing (aka acceleration). The exact behavior of the animation is defined by the spinAround keyframes:
Rotating Words With Css Animations
It is inside these keyframes the entirety of our rotating and translating business lives. In our from and to keyframes, we specify the rotation from 0deg to 360deg respectively. We also specify that the image needs to be translated by 120px, and this detail is duplicated across our from and to keyframes as well.
Now, that our rotation from 0 to 360 degrees is specified as part of our animation keyframes makes sense. That is the property that will actually be animated. Why would we specify the 120px translate in the keyframes as well? Wouldn't it make more sense to have the translate be defined just once inside our .item style rule instead? This strangeness has to do with a CSS quirk where only one transform declaration will win out in the end. We can't specify individual transform functions (at least not yet) and have them work independently. If we specify the translate transform in the .food rule, the rotate transform in our animation keyframes will override the translate transform since it will get applied last. The only way to work around this is to have the final transform declaration that gets applied contain all of the transform functions we'll want to set as well.

Now that we have one food item revolving around our smiley, it's time to add more! Go back to your HTML and add the following highlighted image elements:
How To Start With Css Animations
If we save these changes and preview what happens in the browser, what we'll see will look something a bit like the following:
All of the images will overlap each other and rotate in unison. The rotating in unison part we totally want. That they overlap over each other is something we'll want to fix, and we'll fix this is by setting an offset value for the animation-delay property on each rotating image. The way we calculate the amount to offset the animation on each image by is by dividing the animation duration by the number of images:
Once we have the offset value, we set that to the animation-delay property by putting a negative sign up front and adding an s to signify that it is a seconds time unit.
Rotating Images With Html And Css
For our example, the animation has a duration of 6 seconds. We have 6 images we wish to rotate. This makes the math for our animation-delay offset easy where 6 divided 6 is 1. The negative of that is -1, so we start our offset by -1s and increment by that amount for each additional image. All of this applied to our images will look as follows, so make the highlighted addition of the inline style attribute and animation-delay value:
All of our food items are now evenly spaced! There is one last change to make. The rotating items look a bit too large. It would be better to have them be sized smaller relative to our smiley they are rotating, so

0 Response to "Css Animation Rotate Loop"
Posting Komentar